Processing Thin-Walled Parts for Large-Diameter Soft-Seated Butterfly Valves
Sep 29, 2025
Abstract
As the processing capacity of petrochemical equipment continues to expand, the size and specifications of flue butterfly valves used in catalytic units have increased accordingly. With advancements in refining processes, valve sealing performance is now subject to stricter requirements. After several years of operation, conventional butterfly valves often suffer significant deformation of the valve plate and seat ring sealing pair, resulting in seal failure. Maintenance of the sealing surfaces is both time-consuming and costly. This paper presents a novel sealing structure for large-diameter, high-temperature, micro-leakage flue butterfly valves, analyzes the machining of critical components, and proposes corresponding processing technology solutions.
Conventional sealed butterfly valves use a metal-to-metal sealing structure. Their key components include the valve body, valve plate, and valve shaft, as illustrated in Figure 1. The inner cylindrical wall of the valve body is welded to the upper and lower seat rings. The valve plate and valve shaft are integrated as a single unit, rotating around the valve shaft hole within a specified range. When fully closed, the metal sealing surface of the valve plate directly contacts the metal sealing surfaces of the seat rings. The long-term operating temperature of these valves is typically around 200 °C. However, their large size, combined with wear and deformation, often results in sluggish operation and substantial flue gas leakage at high temperatures.
To reduce costs, manufacturers typically only repair components once they have suffered severe deformation. During maintenance, the valve body must be returned to the manufacturer for mechanical processing, which involves correcting deformation, repair welding, and surface restoration. Due to the extensive deformation, significant welding, and low rigidity of the workpiece, repeated correction and stress-relief operations are necessary, making repairs time-consuming, labor-intensive, and costly.
To satisfy the demands of refining and chemical processes and ensure long-term, stable operation, the sealing sub-structure of the butterfly valve has been innovatively redesigned. The new sealing structure is based on redesigning the valve seat ring and valve plate, replacing the original rigid seal with a flexible one. This flexible sealing design addresses failures resulting from deformation and minor wear of the valve plate and seat ring sealing surfaces. Additionally, the flexible seal is designed as a replaceable component, allowing wear from high-temperature operation to be remedied through periodic replacement, thereby ensuring long-term, reliable valve performance. Compared with a conventional butterfly valve, the new design incorporates a metal seat welded to the inner cylindrical wall of the valve body, with a soft sealing ring mounted at the seat ring. Compared with a conventional butterfly valve, the new design features a metal seat welded to the inner cylindrical wall of the valve body, with a soft sealing ring installed within the seat ring. The soft seat is evenly pressed and fixed in place with a compression ring, using a No. 26 fluoroelastomer to ensure reliable long-term sealing performance at operating temperatures. The rubber sealing ring slightly protrudes above the plane of the seat ring. When the valve is fully closed, the rubber ring contacts the valve plate’s sealing surface, and its high elasticity ensures effective sealing.
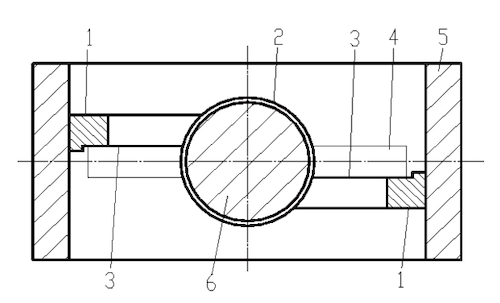
Figure 1 Conventional Butterfly Valve Structure
1. Seat ring 2. Valve shaft hole 3. Seat ring sealing surface 4. Valve plate 5. Valve body 6. Valve shaft
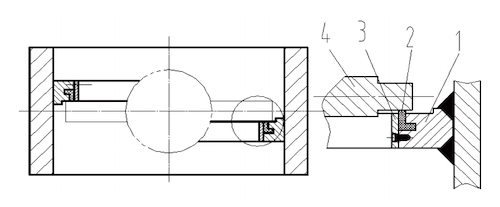
Figure 2 New Butterfly Valve Structure
1. Seat ring base 2. Rubber sealing ring 3. Compression ring 4. Valve plate
The compression ring is a key component of this soft-sealing structure. It must possess sufficient rigidity and toughness to properly compress the rubber sealing ring, while remaining easy to remove for convenient replacement of the seal during maintenance. The compression ring is designed in a split, two-piece configuration and is assembled together with the upper and lower seat ring bases. Its outer circular surface is fitted to the inner bore of the seat ring, and both shape accuracy and dimensional precision must meet performance requirements. Eighty bolt holes are evenly spaced around the sides to ensure the fluoro-elastomer sealing ring is compressed uniformly. The surface of the compression ring that contacts the valve plate sealing surface is flush with the machined plane of the seat ring base, ensuring that when the valve is closed, the valve plate seals exclusively against the rubber sealing ring. To prevent corrosion during long-term service, the compression ring is made of 06Cr19Ni10 stainless steel, which also allows for easy replacement of the rubber sealing ring.
The compression ring is manufactured from 06Cr19Ni10 stainless steel, with an outer diameter of approximately 4000 mm, a wall thickness of 15 mm, a height of 50 mm, and 80 evenly spaced holes around its circumference. This design ensures the compression ring has sufficient rigidity and toughness, fits accurately with the seat ring base, and provides adequate force to securely hold the flexible seal in place.
Because the part is made of stainless steel and features a thin-walled structure, it is not rigid enough for direct machining. To ensure dimensional and shape accuracy, the compression ring is first processed as a complete ring and then cut into two sections. First, the ring is fabricated as a complete unit to its finished dimensions, and then it is cut into two sections. Due to the large size and specifications of the blank, overall forging or direct cutting is not feasible. Instead, the ring must be fabricated by rolling a stainless steel plate into a cylinder and welding it. Maintaining shape and dimensional accuracy during this process is particularly challenging. The main difficulties are outlined below:
3.1.1 When rolling and welding thin steel plates, highly rigid tooling must be employed to limit free deformation. Figure 3 illustrates a schematic of the compression ring after welding. The green portion represents the compression ring. The entire assembly is annealed to relieve welding stress, which stabilizes the overall shape. However, during final machining, the tooling must be removed, which disrupts the previously stabilized state. Consequently, residual stresses in the compression ring can still lead to significant deformation.

Figure 3: Schematic of the compression ring and tooling
3.1.2 Due to the workpiece’s thin walls, clamping forces during lathe turning can easily induce deformation. The primary factors influencing the extent of deformation are the material, wall thickness, overall size, clamping points, and the magnitude of the clamping force. Given the compression ring’s size and specifications, substantial deformation is anticipated. If a four-jaw chuck is used to clamp the workpiece directly for machining the circumference, the clamping force will cause the workpiece to deform. However, during turning, the rotation of the lathe table causes the tool to follow a circular path, resulting in the machined inner and outer surfaces forming a regular circular shape. Once the jaws are released, elastic recovery causes the clamped surface to revert to a cylindrical shape, while the machined surface deforms into an irregular profile, failing to meet the required dimensional and geometric tolerances.
3.1.3 Cutting forces are another key factor causing machining deformation. As chips break, the resistance between the tool tip and the workpiece fluctuates intermittently, generating vibrations in both the workpiece and the cutting tool. This negatively impacts dimensional accuracy, geometric precision, and surface finish. Therefore, selecting appropriate cutting tools and optimizing machining parameters is crucial.
3.1.4 Heat generated during cutting also causes thermal deformation of the workpiece, making it more difficult to maintain dimensional accuracy. For thin-walled metal components like 06Cr18Ni9, which has a high linear expansion coefficient, heat generated during cutting can cause significant thermal deformation, seriously impacting dimensional accuracy. For thin-walled metal components like 06Cr18Ni9, which has a high linear expansion coefficient, heat generated during cutting can cause significant thermal deformation, seriously impacting dimensional accuracy.
3.1.5 Due to the large size and low rigidity of the compression ring, loosening the clamp after turning can cause significant circumferential deformation, resulting in irregular roundness. As a result, a CNC boring and milling machine with a rotary table cannot be used to machine the Φ80-10 compression holes; instead, the hole positions must be manually marked using clamps, applying the equal-chord-length method to determine the centerlines. Drilling is then performed on a conventional drill press following these markings. However, circumferential deformation of the compression ring changes the chord lengths, and manual scribing by fitters introduces cumulative errors. The more holes there are, the greater the cumulative deviation, which may ultimately prevent proper alignment with the screw holes on the valve body seat ring.
Based on the analysis above, ensuring the machining accuracy of the compression ring requires minimizing both deformation and cumulative errors. Therefore, the following process plan is implemented.
To account for potential deformation during heat treatment, a 30 mm-thick 06Cr19Ni10 plate is selected after rolling the thin steel plate into a cylinder, ensuring sufficient machining allowance. After rolling and welding, the cylinder undergoes stress-relief heat treatment to eliminate residual welding stresses. To control deformation during annealing, reinforcement rings are added around the compression ring to minimize circumferential distortion and provide convenient clamping points for subsequent machining. A metal reinforcement ring, 180 mm wide (six times the plate thickness), is welded around the compression ring. Its height (H) exceeds the finished height of the compression ring, providing sufficient allowance for subsequent machining (see Figure 4). During stress-relief annealing, the compression ring is laid horizontally on the tooling assembly, and heavy weights are placed symmetrically on the tooling to minimize deformation.
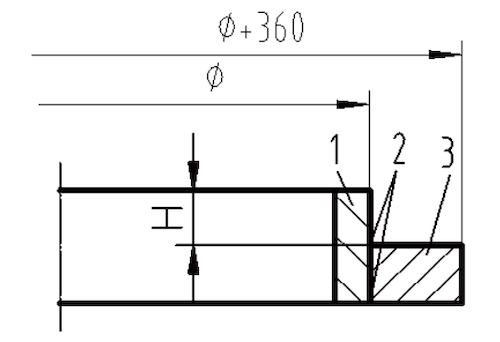
Figure 4. Schematic of the tooling setup
To avoid deformation from radial clamping forces, the compression ring should be clamped and aligned in its natural, unstressed state, ensuring no additional stress is applied during machining. Clamping and alignment should be concentrated on the tooling (see Figure 5). Securing the compression ring via the tooling effectively prevents deformation that could result from direct clamping or pressing on the ring itself.
To reduce the impact of cutting force variations and heat on the dimensional accuracy of thin-walled workpieces, while also minimizing clamping stress, the turning of the compression ring is performed in two stages: semi-finishing followed by finishing. Since the outer circular profile and dimensional accuracy of the compression ring directly influence the sealing performance of the rubber seal ring, and the upper end face requires high flatness, these surfaces demand special attention during machining. In contrast, the dimensional accuracy of the inner bore is less critical. Therefore, during semi-finishing:
- Machine the inner bore to its final size;
- Face the upper end surface, leaving a 0.5 mm allowance;
- Rough-turn the outer diameter, leaving a 1 mm allowance on each side;
Then, symmetrically reduce the clamping force FFF to minimize stress on the workpiece. During finishing, use a shallow depth of cut and shorten the tool overhang to increase rigidity, keeping the cutting edge sharp to minimize the effects of cutting heat. The upper end face and outer diameter are then machined to their final dimensions, and the compression ring is subsequently cut to the specified height. This method ensures precise geometry of the A and B mating surfaces with both the rubber seal ring and the valve body seat ring base (see Figure 5).
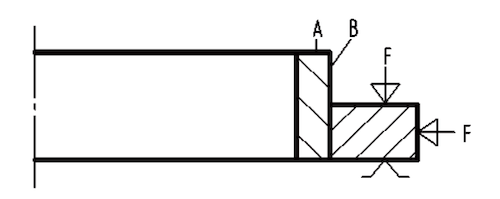
Figure 5. Schematic of clamping and alignment
To reduce the impact of circumferential deformation on scribing accuracy, the 80 × 10 bolt hole lines and bearing hole lines were marked prior to drilling, after the compression ring had been finish-machined. This method minimizes the effect of workpiece deformation on hole position accuracy. As shown in Figure 6, the centerline serves as the reference point, and the 80 × 10 bolt holes are scribed sequentially following the arrow direction. This ensures alignment with the scribing direction of the screw holes on the valve body seat ring, thereby minimizing cumulative errors during manual layout. As a result of these process measures, the key components of the DN4000 large-diameter, zero-leakage flue baffle butterfly valve were successfully produced. The improved design reduced flue gas leakage from 30,000 m³/year in the conventional valve to just 100 m³/year after installation and commissioning. The sealing performance fully meets process requirements, and maintenance has been greatly simplified, allowing the device to operate reliably and stably over the long term.
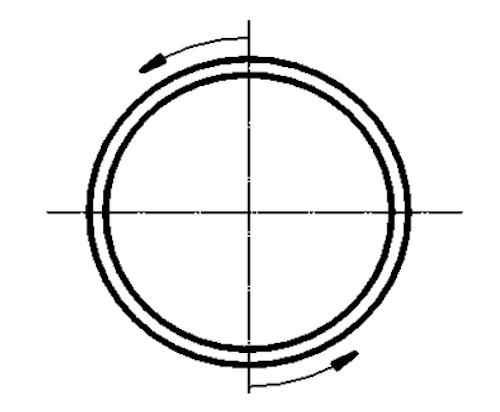
Figure 6. Schematic diagram of the scribing direction
This study systematically analyzes blank material preparation, heat treatment, clamping and alignment, and the selection of cutting parameters for machining large thin-walled components. Practical validation demonstrates that the approach offers a valuable reference for the fabrication of large-diameter thin-walled parts.
Previous: High-Performance NiCr Corrosion-Resistant Ductile Iron Butterfly Valves
Next: Design and Application of Control Valves in Hydroprocessing Units
